Most timber operations are obvious.
 Sawing: to avoid the saw is gets stuck: make a straight cut, use dry wood. Possibly knock a wedge into the cut.
Chopping: chop off small pieces with a sharp chisel. Consider the grain.
Drilling: also with a glowing pen. Support the back against splintering (even when cutting).
Planing: a thin layer, as scraping with a razor.
Sanding: go from coarse to fine grains.
Nailing: boring or upsetting the point reduces the risk of cracking. (The wood fiber is then crushed instead of split.)
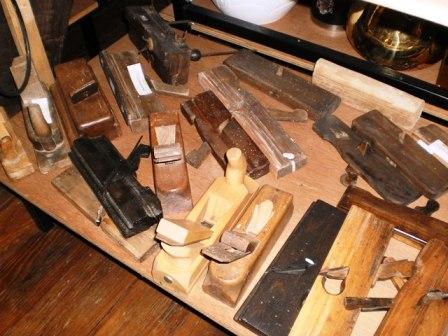
Woodworking joint
Halved joint
Place two strips cross each other, and draw on each piece of the other shape. Cut the lines to half depth, and cut this part out of the woods. The two recesses are fitting together. It can also be applied (with a straight or angled cut) at the corner of a compound, so that the thickness remains the same everywhere. You can still nail or pin them.
Dowel joint (butt joint, miter joint)
Drill in two pieces to connect wood (one head and one long) two holes, right, with the same position and size. Press in one side (with glue) a suitable wooden pen (dowel), and glue the pen than in the remaining free holes in the other piece.
Mortise and tenon joint
Instead of smashing a pen in the butt you divide the width in 3 parts, and saw the two outer parts off. Of these remaining pen you can cut also a top and bottom part. In the other part drill and cut a suitable hole. There are many variations (blind hole, continuous pen with fixing wedge...)
Without glue you can fix dowels and tenons stuck by first cutting through the back, or split it, and in the split you set a small hardwood wedge. If you pound this together the wedge in the back widens the tenon and she gets stuck.
Box joint
Cut from two to connect pieces of end wood teeth (like castle battements) that fit into each other like a zipper. Widely used for drawers. (If you round the teeth, pierce them from top to bottom and connect with a pin, you have a hinge joint.)
Dovetail joint
Ditto, but the teeth have a dovetail shape. Strong connection. Can also be made hidden, but that's a lot of work.
Groove joint
For the bottom of the drawer, use a groove where it fits into.
Tongue and groove
If you glue together two pieces with a slat slotted between.
Wood bending
The wetter the easier it bends. A humidity of around 18% is ideal. Wet wood will shrink a lot when drying. Quarter wood bends easier. Hardwood bends better than softwood. Oak and ash are good, beech is ideal (and often used for seating).
Steam makes wood weak.
Take an iron pipe as tube: fold one side tight and dense. Boil a little water in there. Hang the timber in the tube, but not in the water.
The thicker the wood the longer it should be steaming. Half an hour for a thin bar and a few hours for wood of 5 cm. Too long steaming is not possible. If in doubt, just go on steaming.
Make a very strong template to compress and clamp the wood. (E.g. a table full of pens.) The mold should be slightly more curved than the desired final shape to compensate the rebound afterwards.
Press the red-hot wood fixed immediately after steaming into the desired shape. Let it cool for a few hours or days. The point of the story is that you should not stretch the outside of the curve, you have to squeeze together the inside.
A small bow can already be done by wetting and heating over a fire.
Furniture
 Before the industrial revolution lumber was more precious than now. Sawing shelves was time consuming handwork. That made furniture very expensive.
Some landlords had several castles or houses, but only one set of furniture. That is why it had to move often: they had to be mobile. Hence the German word Möbel means both mobile and furniture.
To transport furniture on a cart, they should take quite as little space as possible. Therefore, many period furniture was assembled with pins and pens, and easy to disassemble. The folding chair is also centuries old. He was 3,000 years ago already in use by both Germans and Egyptians.
- You are here:
-
Home

- Wood working, basics