I learned forging from an old, West Flemish blacksmith who as tools master like managed the mobile forge by the excavation of the Albert Canal. He continued to live later in Eigenbilzen (Limburg) until his death. It was an incredibly skilled craftsman who could smith all metal. Copper (red and yellow) he preferred to work without spectators or help, because the fumes were toxic. The only problem was, he couldn’t explain anything. But he remained patient, showing anything to me until I realized more or less that I had to watch the metallic colors, the sound of sizzling or steaming under water, the sound of the iron as you hit the anvil with it... He could make steel just as hard as was needed, e.g. to cut stone, to split iron or.. to pierce steel.
 The simplest and oldest forges consisted of a hole in the ground. Some (with clay) covered gutters to the center made it possible to drive with bellows extra air trough the (char)coal to get a hotter fire.
The principle of a brick model at table height remains the same. The air channels may be of iron, or the bellows can be suspended, or replaced by a hand -operated or electric fan.
Under the fire is usually a (steel) pipe mounted vertically downwards, which includes a rotary valve. Which can open in order to remove ash or to supply air. The active air flows into its side above this flap. To exploit the blown air, the valve should be closed of course.
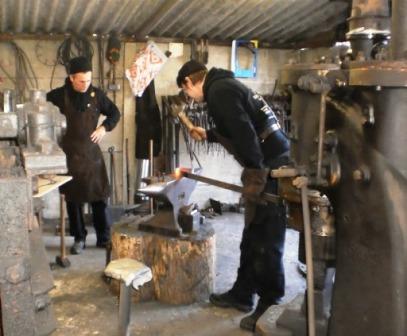
Also useful: smoke extraction, a ton of fat coal (or coke) and a scoop, a scraper, a rod to hang pliers on.
A steel base (e.g. the field forge) won’t glow or melt: the heat from the fire rises, and the steel is usually protected by a layer of ash.
Use near fire nowhere flammable materials. Wear a leather apron and gloves. Sparks can jump far. And even if it no longer glows, steel remains a long time very hot!
You only need a small core fire because you only can hammer a small portion of the steel while it still glows. It makes no sense to glow a long piece in its entirety. A larger fire is easier to lay larger pieces. In a small fire you have to hold (or hang) them.
Punching is pressing or hammering (knockout punch) a (mostly round) form (the scrap (slug)) out of a (by a die) supported plate, the principle of the hole punch for paper. It is sometimes also called blanking (the scrap is the workpiece), stamping, die cutting, but can also stand for forming and bending.
With a thick steel bar with holes of different diameters in it as die, and the matching punches (blunt chisels) on the other hand, my teacher could very precise and with one bang punch e.g. a steel blade (cold!). The punch must be centred exactly on the underlaying, not visible die. (Or use the (pritchel) hole on the anvil.)
Good work starts with good tools. Most blacksmiths make their own pliers, and adjust if necessary also at the work (piece) to. My first anvils were a piece of train track and a 25 cm wide H - profile. For good ironwork you need an heavier anvil. Very useful if you also have a square (hardie) hole in which you can fix points, rolls, chisels, pyramids and other forms. You need always one hand to hammer and one for the pliers with the workpiece. At such upstanding tool you can easily cut pieces, folds, etc. It aids like a third hand.
You have to strike while the iron is hot. It cools again on the cold anvil, so you try to hammer fast, as it becomes less and less processable. It is also convenient to work by 2. The helper then strikes each time with a large, heavy sledgehammer exactly at the place where the blacksmith also indicates his knock. You must persist the same cadence. The signal to stop was with us that the blacksmith rested his hammer with the flat side on the anvil. (Talking or calling did not work, because you were deaf hammered.)
Forging tools yourself is creative customization for each blacksmith.
If you want to make a pliers you base the model on a pair of scissors. Two bars, a hinge hole in it and a rivet through it. By changing shape and position you get pincers, scissors, tongs, snips, curved pliers...
Of bad steel you cannot make good tools.
Stone and iron chisels are usually made from one piece. Wood chisels also get a wooden vest. They can be fixed to put a pin in the handle reinforced with an iron ring. Whether you bulge a hollow top at the chisel, so that the handle can be put in there like in a shovel or spade.
For a knife you should also provide that the blade extends far enough to fasten it in the handle.
To make a chain you forge rods to elongate, O- shaped loops. You can weld them shut, or forg a close overlap.
To get more length with less material you can also make sticks ending on an combined O. This form is less flexible, but sometimes that's actually an advantage.
A forged nail is square. You can round him (more), but I suspect this was not done because square was faster to make, and it was expected to sit firmer because it cannot be so easily unscrew or pryed as a round counterpart. When hammered the point -where it was possible- was folded back and beaten down to get a better adhesion. Also in hooves nails were knocked obliquely through the horseshoe to the outside, and turned over there as a hook for better and longer adhesion. The simplest model has no head, just an L - shape.
Make sure that you have always multiple (4 +) irons in the fire. It 's a shame to stoke the fire for just one piece, and you lose too much time every time to wait for your iron is glowing again. Eventually you can make 4 x the same piece.
- You are here:
-
Home

- Blacksmithing is sweating